Nitty Gritty on Professional Jekyll Posts
contents
- Markdown
- Emoji
- Effective Style and Tone
- Styling Mathematics & Inline Code
- Code Blocks
- Figures
- Referencing Sections & Subsections
- Iterating
- Managing Drafts
- Jekyll Logistics
- Previewing Your Post
- Cross-Posting onto WordPress
- Cross-Posting Lite™
- Comment or Social Section
- Supplementary Information
- References
- Acknowledgements
Class blogs have grown into a core tool of the educational experiences, like the CSE 491 Advanced C++ Seminar and this summer’s WAVES Workshop, I’ve had the pleasure of facilitating. I typically have students contribute to the blog as part of their own learning experience.
I love this format because it helps,
- develop students’ professional communication skills,
- provide students a sense of accomplishment via a tangible, rewarding deliverable,
- showcase students’ work to the general public,
- showcase students’ work to potential employers,
- showcase students’ work to mentors’ evaluators,
- more effectively capitalize on students’ work after they leave the lab group or classroom, and
- sausage factory more useful information out into the ether that someday somebody will be very happy to have Googled upon.
This writeup provides guidance targeted to students writing entries for these class blogs (hi! ![]() ).
It should also contain a few actionable nuggets for other authors writing professional blog posts with Jekyll, though!
I hope that other instructors, in particular, may find this a useful resource for bringing similar models into their classroom.
).
It should also contain a few actionable nuggets for other authors writing professional blog posts with Jekyll, though!
I hope that other instructors, in particular, may find this a useful resource for bringing similar models into their classroom.
![]()
🔗 Markdown
Jekyll runs on Markdown. If you’ve never used Markdown before, here’s a good tutorial to get you started. It should only take about ten minutes. This cheat sheet comes in handy for touch-and-go reference when you’re just getting started writing using markdown.
Alright #academictwitter, let's get to the bottom of this.
— Maxwell Joseph 🍩 (@mxwlj) February 23, 2020
When using LaTeX for academic writing ✍️, each line represents
For the love of Git,
- please please, one sentence = one line
- makes tracking diffs easier
- makes reorganizing paragraphs easier
- makes reading plain text easier
- but if you’re otherwise inclined I won’t cramp your style

- set up your editor to automatically strip trailing whitespace when you save files
🔗 Emoji
Highly recommended!
They’re a great way to signal emotion ![]() and add
and add ![]() visual interest
visual interest ![]() .
.
![]() Plus, did you know they’re a super easy way to emulate the types of info or comment boxes you might find in nicely-formatted articles?
Plus, did you know they’re a super easy way to emulate the types of info or comment boxes you might find in nicely-formatted articles?
![]()
![]()
![]() Overuse of emojis can all too easily become untreatable, a chronic condition known as Cheritis.
Proceed with moderation.
Overuse of emojis can all too easily become untreatable, a chronic condition known as Cheritis.
Proceed with moderation.
You can paste emojis directly into markdown source, but a better way is to use embed codes.
Say that you wanted to emulate my 70-something dad’s emoji stylings.
Good morning
Matthew. Wish you a happy day. Love you.
Here’s how you’d do it in Markdown.
Good morning :sun_with_face: Matthew.
Wish you a happy day.
Love you.
There’s a plethora of easily Google-able embed code cheat sheets floating around the internet. Some are more usable than others. Here’s my favorite one.
🔗 Effective Style and Tone
Especially with blog posts, you have to go far out of your way to earn top-to-bottom readership. If your blog isn’t skimmable or exceptionally engaging, much of your audience will click away after only a few seconds.
- Keep sentences short.
- Use active voice with powerful action verbs.
- Focus on high-level intuition.
- Be personable and engaging, maybe a little silly.
- imo good ol’ Strunk & White serves as an excellent reference in this regard
![]() Don’t let concern for prose quality induce writer’s block.
For some folks, it works best to stream-of-consciousness out a rough starting point and then make a second pass to fix it up to a readable state.
Don’t let concern for prose quality induce writer’s block.
For some folks, it works best to stream-of-consciousness out a rough starting point and then make a second pass to fix it up to a readable state.
When touching up a rough draft, hone in on screen-filling walls of text. These will decimate your audience retention.
Imagine each subset of your post where only plain text (even worse, just a single run-on paragraph) is showing like the Home Alone house basement: two bumbling crooks (your audience) enter, at best one bumbling crook makes it out. In other words, you’ll lose a significant proportion of your readership at each wall of text.
Once you’ve written your post, make a pass to check for long plain text sections. In order to refactor your walls of text,
- Break paragraphs into shorter parts.
- One sentence paragraphs are okay for important points.
- Use lists.
- Break the text into shorter sections or subsections and make use of headers.
- Embed tweets.
- Add memes, GIFs, or cartoons.
- xkcd and PhD comics are classic cartoon wells
- you can even draw or otherwise concoct your own
-
 Be sure to limit the loop count on GIFs and understand accessibility concerns.
- Use bolding to highlight important points and boost skimmability. For a good example of this in action, check out Sean Kennedey’s blog post for CSE 491.
Prefer embeds to links if you really want your audience to check something out. Even if you resort to CAPS LOCK to STRONGLY ENCOURAGE your audience to check out a link, your click-through rate will probably still be disappointing.
🔗 Styling Mathematics & Inline Code
Style inline code with backtick `flags`.
At least italicize mathematical variables or equations like y=mx+b.
You can use block quotes to do slapdash block math.
y=mx+b
Ideally, use MathJax for nicely-rendered in-browser \(\LaTeX\)-style math.
For example, $$y=mx+b$$ ![]() \(y=mx+b\).
\(y=mx+b\).
Another example of block math,
<div>
\begin{equation*}
y=mx+b
\end{equation*}
</div>
![]()
You’ll have to include their JavaScript at the top of your page. It’s probably already taken care of on class or workshop blogs that I set up. For your personal blog, see their information on getting started.
🔗 Code Blocks
This is a code block.
# The Answer to the Ultimate Question of Life, The Universe, and Everything
print(42)
Here’s how to make it happen in Markdown.
```python
# The Answer to the Ultimate Question of Life, The Universe, and Everything
print(42)
```
Note the language name (python) following the backticks.
Specifying the language name enables syntax highlighting, which makes the code block a lot more readable.
See here for a list of supported languages.
If you are embedding screenshots of code into a blog post, take a moment to reconsider whether it would be better as an (accessible, copy-pasteable) code block.
You don’t have to explain all the code using text outside of the code block. Inline comments inside the code block can sometimes be more effective for step-by-step explanation. Or, consider breaking the code block up into shorter bits with explanations inbetween.
If you can help it, keep code lines short to prevent annoying your readers with too much side scrolling.
🔗 Figures
Figure MVIFC demonstrates a figure with full-width image content, an anchor-linked title, and a brief caption.
 Figure MVIFC.
My very important ferret collage.
Total cuties.
Figure MVIFC.
My very important ferret collage.
Total cuties.
Here’s how to write that in Markdown.
{:style="width: 100%;"}
[**Figure MVIFC.**](#fig-mvifc){:id="fig-mvifc"}
*My very important ferret collage.
Total cuties.*
Here’s how to write an in text reference to that figure in Markdown.
[Figure MVIFC](#fig-mvifc) demonstrates a figure with...
In blog posts, I’m partial to labeling figures by acronym instead of numbering them. This makes it easier to re-order figures. Anchor links make it easy to locate specific figures without sequential numberings. (I stole this idea from Prof Rob Beezer & his fun Theorem names.)
Generally, when you include images into your post you’ll want to target a horizontal format.
Otherwise, the images will blow up to absurd sizes on desktop browsers.
You could add CSS to the {:style=""} tag.
Another easy way to get a horizontal format is
collage things together.
I’ve found this web tool useful for throwing images together.
When you generate graphs, save them as high-resolution (300 DPI) .png’s with transparency enabled.
Here’s how to do that with Matplotlib.
# ... all your seaborn & Matplotlib junk
# then,
plt.savefig(
  'title-slug-descriptor.png',
  transparent=True,
  dpi=300,
)
🔗 Referencing Sections & Subsections
For the class blogs, I’ve already got Jekyll set up to automatically generate anchor links for each section and subsection.
Section names are “slugified” to generate anchor link IDs, meaning
- non-alphanumeric non-whitespace characters are stripped,
- whitespace is mapped to the
-character, and - all characters are made lowercase.
For example, to reference Section mY eXAmPlE SUBSECTION!? ![]() ,” we’d write
,” we’d write
[Section mY `eXAmPlE` SUBSECTION!? :cat:](#my-example-subsection-cat)
Sections and subsections work exactly the same way.
If you’re unsure what the anchor ID will be for a subsection, serve a local copy of the site and click on the anchor link next to the subsection title to reveal the anchor ID in your browser’s url bar.
🔗 mY eXAmPlE SUBSECTION!? 
![]()
![]()
![]()
![]()
![]()
![]()
![]()
![]()
![]()
![]()
🔗 Iterating
I typically divide blog post assignment into the following series of cascading checkpoints, each with a separate deadline.
🔗 Topic
- Open a pull request on the course website that adds a template post with a descriptive title.
- Mark your pull request with the “topic” label and comment on the pull request with a brief description of your post.
- Consider referring to the Possible Course Topics subsection
🔗 Outline
- Lay out what you plan to cover and how you plan to organize it.
- Should consist of section headings, written-out topic sentences, with some details as bulleted lists.
- Curate, as applicable, the following:
- illustrative code snippets,
- embedded components (e.g., Compiler Explorer sandboxes or web applet fragments), or
- data presented as graphs and/or tables.
-
If you don’t yet have one of these cornerstones in hand (i.e., haven’t generated the data or written the code), just describe what will go there instead.
- List references.
- Any text included verbatim should be designated with “ or > (block quotes) and attributed.
- Any code included verbatim should be attributed with inline comments or in the post’s body.
- Push to update your pull request and update the label to “outline.”
-
The more thorough your outline, the better the quality of feedback you’ll be able to solicit.
🔗 Rough draft
- Flesh out full, best-effort prose for your post.
- Make at least one pass for typos, grammar, and sentence flow.
- Push to update the post’s pull request and update the label to “rough draft.”
-
Again, the better the quality of your draft, the better the quality of feedback you’ll be able to solicit.
🔗 Peer review
- Provide line edits,
- Suggest specific changes and/or note frequently occurring issues and
- advise on relevant memes and GIFs (as applicable ).
- high-level comments, and
- Constructively critique organization, subsection lengths, assumed reader background knowledge, author voice and style, etc.
- reader experience feedback.
- What was it like reading the post?
- What were your takeaways from the post?
- Share reviews as a comment on the post’s pull request.
🔗 Completed draft
- Incorporate reviewer suggestions or briefly justify objection.
- (In addition to peer reviewers, instructors may also provide suggestions.)
- Push to update the post’s pull request and update the label to “completed draft.”
🔗 Managing Drafts
In classroom scenarios, I’ve had good success having students store drafts of their projects as open pull requests on the repository for the class website.
This can work well for drafts on a personal Jekyll blog, too. If you’re looking to keep a draft completely under wraps, though,
- open a private GitHub repo,
- maybe
https://github.com/username/secret
- maybe
- add it as a remote (maybe called
secret),git remote add secret https://github.com/username/secret
- branch out
my-draft, commit your draft, & push it up tosecret.- i.e., instead of
git push origin my-draft - you’d do
git push secret my-draft
- i.e., instead of
I usually just go ahead and push up drafts in progress to master though.
It’s not like anyone’s really trawling your blog before you share something around anyways.
![]()
🔗 Jekyll Logistics
Because class blogs involve so many collaborators, we have to take special care to keep everything tidy.
Your blog content will reside as a Markdown (.md) file in the blog/_posts/ directory.
.
├── blog
│   └── _posts
│       └── 2020-07-16-title-slug.md
It should be named year-month-day-, then title-slug then .md.
The date should correspond to the day you anticipate publishing the post (i.e., the final due date). Remember leading zeros for one-digit months and days!
The title-slug should incorporate descriptive keywords related to your post’s topic.
It’ll be used to generate your post’s url, so keep it short three or four words max!
Your post will need to incorporate a header like the following. (You can just copy/paste it to start off with!)
---
layout: post
title:  "Wolverine: The Least-Best Superhero"
date:   2020-07-16
author: Sparty McSpartface
---

Blog content goes here.
Files you want to display or link to in your blog post should be stored in the assets/ directory.
To keep the file tree manageable and to prevent merge conflicts, put files in a subdirectory of assets/ named exactly after your GitHub username.
.
├── assets
│   └── username
│       ├── title-slug-descriptor-1.gif
│       ├── title-slug-descriptor-2.png
│       └── title-slug-descriptor-3.pdf
|
Prepend asset filenames with your post’s title-slug.
Then, place a brief descriptive slug followed by your file’s extension.
When you embed images or link to assets, you’ll use the path {{ site.baseurl }}/assets/username/title-slug-descriptor.ext.
The {{ site.baseurl }} is Liquid magic that you should just leave in verbatim.
Here’s an example of what embedding an image looks like in Markdown.
{:style="width: 100%"}
Here’s an example of what linking to a downloadable file looks like in Markdown.
Check out my [cool cool source file]({{ site.baseurl }}/assets/username/title-slug-descriptor.ext).
![]() If you’re not comfortable with Git on the command line, all of the tasks necessary to write and publish a blog post can be accomplished using GitHub’s web interface!
However, working on your own machine allows you to throw up a live local preview of your post, which is super handy.
If you’re not comfortable with Git on the command line, all of the tasks necessary to write and publish a blog post can be accomplished using GitHub’s web interface!
However, working on your own machine allows you to throw up a live local preview of your post, which is super handy.
🔗 Previewing Your Post
In order to preview your site from your own machine, you’ll have to install Jekyll.
Depending on the platform and whim of the install gremlins, sometimes this can be easy & sometimes it turns tricky.
Then, you would just run jekyll serve (or, alternately bundle exec jekyll serve) and point your browser to at https://127.0.0.1:4000/.
As @uma-sethuraman figured out, you can actually have GitHub run Jekyll for you and preview your fork via GitHub pages.
You can pull your blogpost branch into your fork’s master branch and then if you go to your fork’s settings, there’s a “github pages” section. There, you can set the source to your fork’s master and then it will give you your local github url where your blog post should be hosted, so at that url, you can see what your post would look like once published.
🔗 Cross-Posting onto WordPress
![]() This section is mostly relevant to DevoLab undergrads who want to post on the lab blog.
This section is mostly relevant to DevoLab undergrads who want to post on the lab blog.
Sometimes, you’ll have to walk into ~Mordor~ Wordpress. Fortunately, there’s a secret way to blog on WordPress without actually having to blog on Wordpress!
- Browse to your rendered Jekyll blog post.
- can be on
localhostor on your actual website
- can be on
- Call up developer view on your internet browser.
- usually
ctrl-shift-I
- usually
- Click “Elements.”
4.Find the
divcontaining the div with classpost-contentand copy it.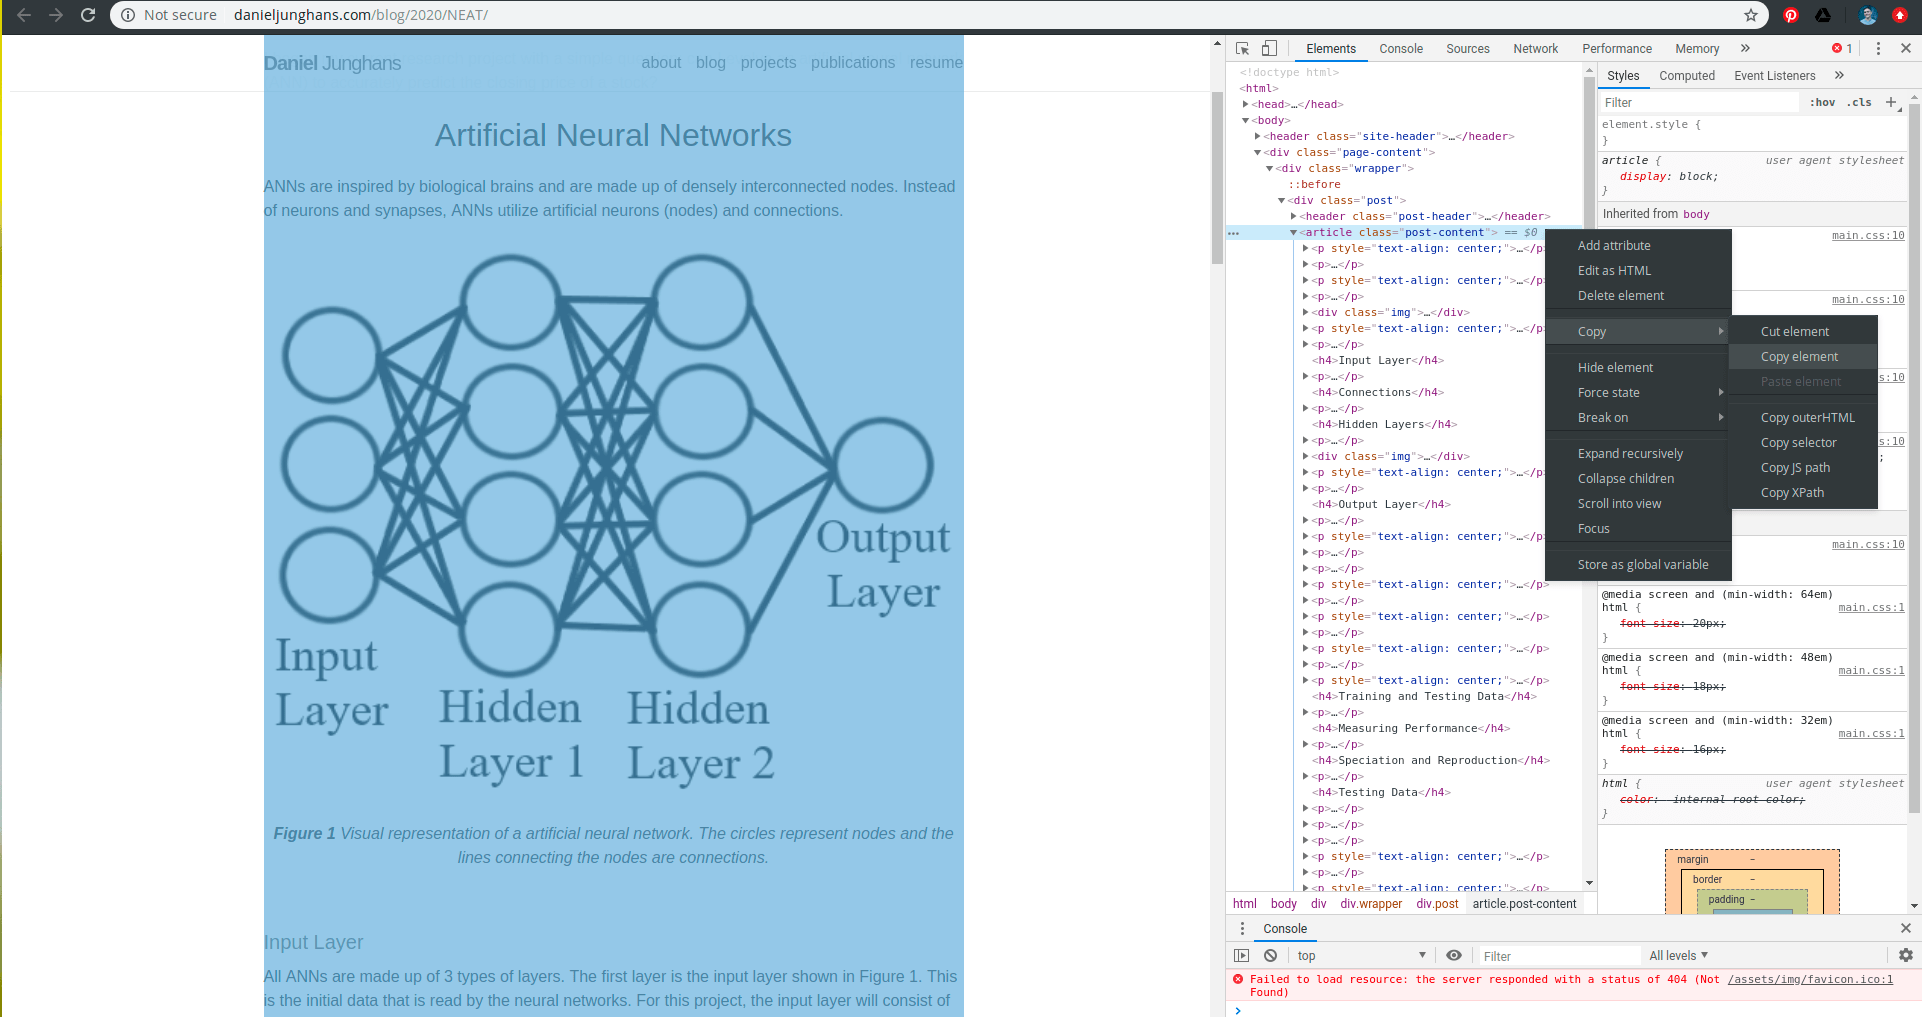
- Go to https://devolab.org/login and log in.
- if you don’t have a login, send me your MSU username and your preferred email
- Start a new post.
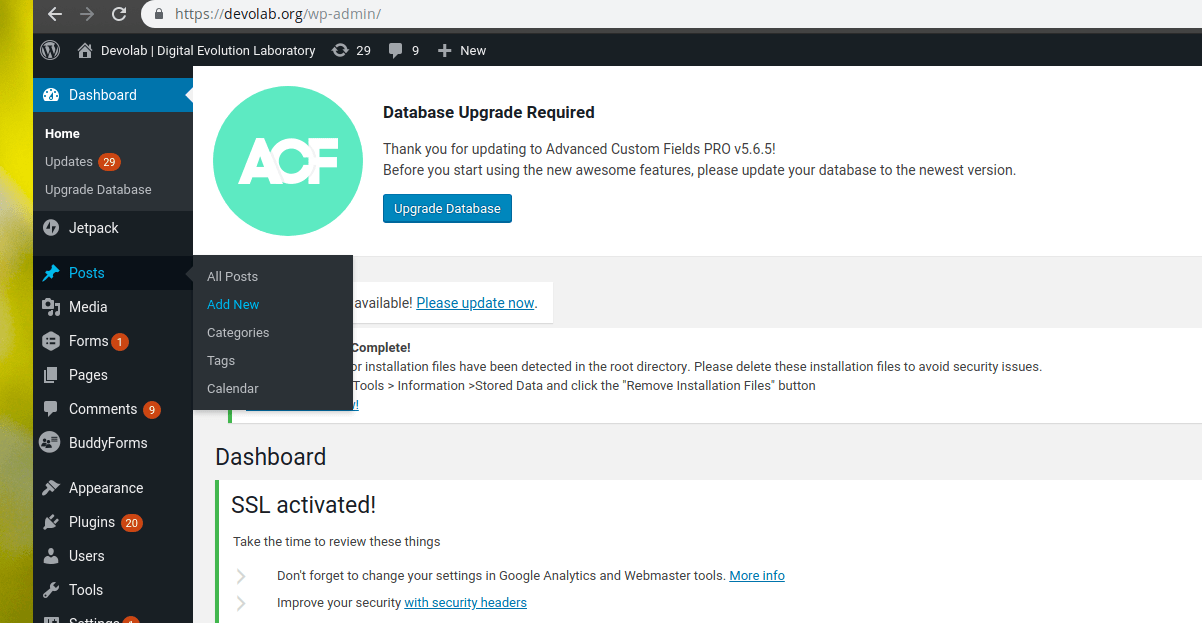
- Select “custom html” and paste in your copied html.
- You can also add a notice to the top to refer traffic back to the original source.
This material is cross-posted from my personal blog. You can find the original version <a href="TODO">here</a>. <br /> <br /> - Unfortunately, you might have to fix embedded images’ urls manually.
- but everything else should just work automatically

- you can find the address they’re hosted on at your site and fix all the
<img src="">’s to point there - the Better (but Even More Annoying) Thing, though, would be to upload all the images to the WordPress server and then update the image urls to point there
- but everything else should just work automatically
🔗 Cross-Posting Lite™
Consider creating a listing of links to blog posts you’ve written for other outlets. You can host on the landing page for your own blog!
Mentors: why not add a section to your own blog or professional site where you list your mentees’ blog posts?
🔗 Comment or Social Section
You can use a service like Disqus to embed a proper comment section in your post.
I’ve found that embedding a tweet about the blog post can serve a similar function well enough. Plus, it’s an easy way to plug your twitter!
If you have any questions, comments, etc., about this post, hop on the twitter thread right below so we can chat. Asking a few questions is good for prompting engagement, so… how have you incorporated Jekyll and/or GitHub into your classroom? What’s worked well and what hasn’t? I’m actually curious to hear more about others’ experience with these tools.
new blog post covering
— Matthew A Moreno (@MorenoMatthewA) July 17, 2020
* 🧑🏫how & why I use class blogs as a teaching tool
* practical tips for effective professional Jekyll blog posts 🛠️
* oh & slipped in the middle some assignment criteria 4 my students😈
so hopefully, something there for everyone?https://t.co/OsEZVES6Lu
🔗 Supplementary Information
You don’t have to shove everything into code blocks or linked download-able files.
Consider making use of
🔗 References
Some references — like Stack Overflow answers, magical GitHub gists, talk recordings, or non-academic blog posts — are fine to just link to in the text without a proper citation.
For papers and other more formal resources, you’ll want to use inline citations with a reference section at the end.
Try your very best to formally cite the software you use, too.
This might be a corresponding paper or a DOI that has been set up for the software itself via a service like Zenodo.
Citing software is very important for the researchers who take the time to package up and distribute software for the community.
Many projects will include information on how to cite them on their README.md.
Take ten minutes to make a pass through your project’s dependencies and check if each piece of software has a citation you can use.
Here’s how to enter list citations in a References section at the end of a blog post.
<a
  href="http://doi.org/10.1109/MCSE.2007.55"
  id="hunter2020matplotlib">
Hunter, J. (2007). Matplotlib: A 2D graphics environmentComputing in Science & Engineering, 9(3), 90–95.
</a>

<a
  href="http://doi.org/10.5281/zenodo.2575607"
  id="charles_ofria_2019_2575607">
Ofria, C., Dolson, E., Lalejini, A., Fenton, J., Moreno, M. A., Jorgensen, S., Miller, R., Stredwick, J., Zaman, L., Schossau, J., Gillespie, L., G, N. C., and Vostinar, A. (2019). Empirical.
</a>
This is what the corresponding output looks like.
Some guidelines:
- List references alphabetically.
- Pick a format (MLA, APA, Chicago, etc.) and stick to it.
- Use a tool like Google Scholar to automatically generate copy-pasteable plain text citations in your chosen format.
- If you have BibTeX, you can use this online app to effortlessly extract copy-pasteable plain text citations in your chosen format.
- Prefer hyperlinking to papers via DOIs (Digital Object Identifiers).
Use this formula to translate a DOI to a url:
my-example-doi
http://doi.org/my-example-doi. - Don’t link to books via Amazon
 .
Consider linking to a permanent resource like WorldCat instead.
.
Consider linking to a permanent resource like WorldCat instead.
🔗 Acknowledgements
List collaborators, mentees, and mentors involved in the project here. Disclose grant numbers and institutional support.
For bonus points, include head shots and link your friends’ websites! (Include your own pic and your own link, too.)