
Building Interactive Tutorials for Empirical Web Apps
🔗 Project Introduction
As web apps become bigger and more complex, it becomes more and more important to provide good learning resources for users. Simple text guides are great to have, but they have numerous shortcomings:
- They give you more information than you need.
- It can be difficult to find the exact info you’re looking for.
- Users have to spend time and energy connecting what they see in the docs to the real app.
- They’re not interactive.
- Navigating to the documentation disrupts the app experience.
Well produced documentation can mitigate the first three issues, but even the best written docs can’t solve the last two.
This is where interactive tutorials come in. ![]()
Interactive tutorials are becoming increasingly common. Big name apps like Photoshop, Slack, Discord, and many others provide interactive tutorials. I think we can safely say they’re the gold standard when it comes to showing users the basics of your app, or even beyond!
However, creating an interactive tutorial can be a decent bit of extra work. Therefore, we’ve created this library to streamline the process for Empirical web apps. It’s a flexible and extensible system for creating virtually any kind of interactive tutorial.
So here we have a tutorial… about how to create tutorials. Ironically, this is a written, non-interactive guide. But hopefully it will serve as a useful reference and introduction to the tutorial system.
🔗 Conceptual Structure of a Tutorial
In this framework, a tutorial is essentially made up of 3 things:
- States - the different states your tutorial can move between.
- Triggers - events or actions that move the tutorial from one state to another.
- VisualEffects - any visual changes made to the web app as part of the tutorial.
You’ll need all 3 of these things to make a tutorial that does anything useful!
It’s helpful to visualize a tutorial as a directed graph. In this graph, the nodes are what we’re calling states, and the edges are our triggers:
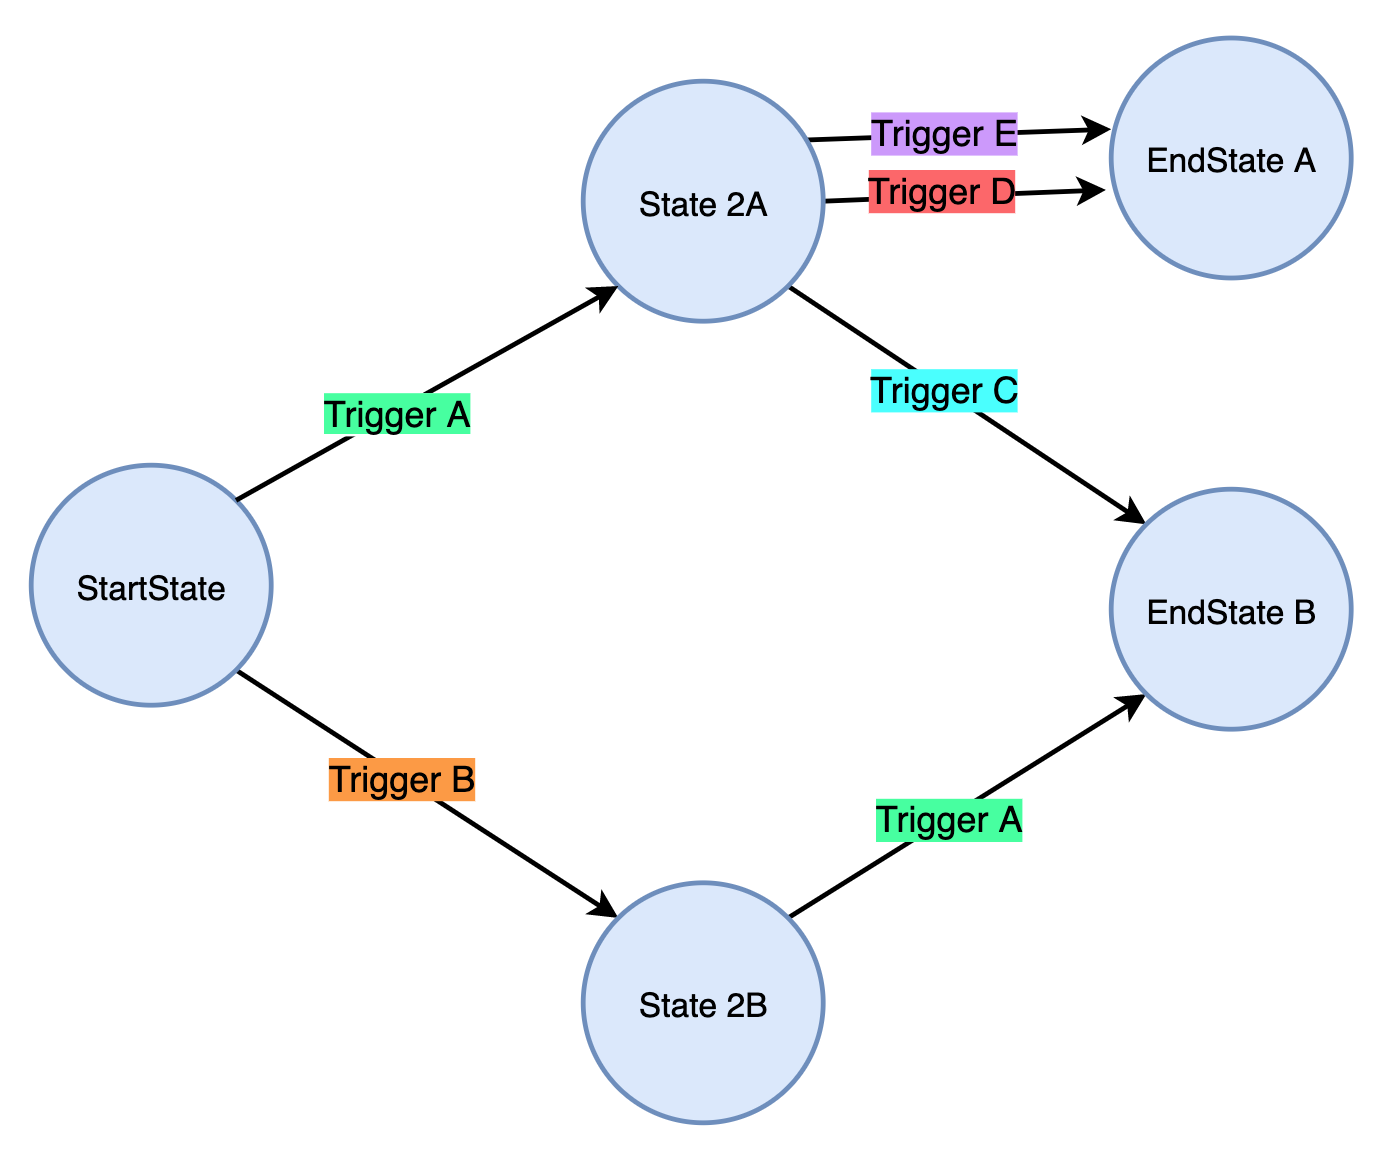
One can see the flexibility of this system. It supports complex, nonlinear tutorials out of the box. Notice how states can have multiple triggers, to multiple different states. Also note that triggers can be reused between different states (such as Trigger A in the example above).
Visualeffects are not pictured in this graph, but you can imagine them existing inside of the individual states. Actually, both triggers and visualeffects exist only within states. So each state has a list of triggers, and a list of visualeffects, that will all be activated when the state is entered (and deactivated when the state is exited).
🔗 Code Preview
The code for a very simple tutorial might look something like this (the method arguments are omitted for now):
Tutorial tut();

tut.AddState(...);
tut.AddState(...);
tut.AddState(...);

tut.AddManualTrigger(...);
tut.AddEventListenerTrigger(...);

tut.AddCSSEffect(...);
tut.AddOverlayEffect(...);
tut.AddCustomVisualEffect(...);

tut.StartAtState(...);
As you can see, the Tutorial class provides the entire programming interface for the tutorial. Everything you do to manage your tutorial will be done via method calls on this object. ![]()
Most Tutorial methods can be chained, so you could also write that same code like this:
Tutorial tut();

tut.AddState(...)
.AddState(...)
.AddState(...);

tut.AddManualTrigger(...)
.AddEventListenerTrigger(...);

tut.AddCSSEffect(...)
.AddOverlayEffect(...)
.AddPopoverEffect(...);

tut.StartAtState(...);
Now let’s take a closer look at how this all works!
🔗 Tutorial Class
To begin, you must instantiate a Tutorial object. This is easy:
Tutorial tut;
As stated before, all setup and manipulation of the tutorial will be done through this object.
🔗 States
An active tutorial is always in a certain state. For example, you might have a state where you wait for the user to click a particular button. Of course, just having a state by itself is pretty much useless. ![]()
A state gains meaning by having triggers and visualeffects associated with it. But we’ll get to those shortly.
🔗 Creating States
To create and add a state to the tutorial, simply call AddState() and give your new state a unique name:
tut.AddState("start_state");
We can now refer to this state in our other method calls. ![]()
🔗 End States
A state that does not contain any triggers is called an end state. If an end state is entered, the tutorial will automatically stop. This means you don’t have to do anything special to make a state an end state! :)
🔗 Triggers
Triggers are things that move the tutorial from one state to another when they are “fired”.
With the exception of manual firing, triggers must be active in order to fire. States automatically activate all their triggers upon being entered.
There are a few built-in trigger types, or you can define custom trigger types.
🔗 Trigger Parameters
All methods for adding triggers use the following parameters:
- current_state - name of the state that this trigger should be activated for.
- next_state - name of the state that the tutorial should move to when this trigger fires.
- trigger_id - (optional except for custom/manual triggers) a unique string ID for this trigger.
- callback - (optional) a callback function to be called when this trigger fires. The function must return void and have no parameters.
🔗 Built-in Triggers
🔗 ManualTrigger
The simplest type of trigger is the ManualTrigger. It only fires when you fire it manually from your code. Amazing, right?
tut.AddEventManualTrigger(state, next_state, trigger_id, callback);
- The trigger_id is required for ManualTrigger.
🔗 EventListenerTrigger
The EventListenerTrigger listens for the given html event on an Empirical widget, and fires when the event occurs.
You might use it to move to the next state when a button is clicked.
tut.AddEventListenerTrigger(state, next_state, widget, event_name, trigger_id, callback);
- widget is the Empirical widget the event listener should be placed on (you must pass the actual widget, not its ID).
- event is the name of the html event to listen for, but without the “on” at the beginning (e.g. “click”).
🔗 Custom Triggers
To create a custom trigger, define a class that inherits from trigger:
class CustomTrigger : public Trigger {

    friend class Tutorial;
    friend class State;

    Customtrigger(...) {};

    void Activate() {}
    void Deactivate() {}
};
- The friend declarations are necessary, and the Activate/Deactivate methods must be defined.
- Activate() is called every time a state containing the trigger is entered. It will also be called immediately if a trigger is added to the current state.
- Deactivate() is called when a state containing the trigger is exited, or when the trigger is removed.
Then, to add your custom trigger:
tut.AddCustomTrigger(current_state, next_state, custom_arg_1, custom_arg_2, ..., trigger_id, callback);
- Between next_state and trigger_id, you supply the arguments to the custom trigger you defined.
- In order to avoid potential conflicts with custom parameters, the trigger_id is required for custom triggers. The callback, as always, is optional.
🔗 Reusing Triggers
If you’ve previously added a trigger to some state, you may add it to another state with this method:
tut.AddExistingTrigger(current_state, next_state, trigger_id);
🔗 Manually Firing Triggers
All triggers can be manually fired, as long as you have their trigger ID:
tut.FireTrigger(trigger_id);
This must only be done for triggers in the current state, but the trigger does not have to be currently active.
🔗 Removing Triggers
You may remove a trigger from any state containing it:
tut.RemoveTrigger(trigger_id, state_name)
Note that this will deactivate the trigger if it is active.
🔗 VisualEffects
A visualeffect is any visual change made to your web page within the context of the tutorial.
This could be adding an element to the page, changing the CSS styling of an element, or anything you want via a custom visualeffect class!
As with triggers, states automatically activate all their visualeffects upon being entered.
🔗 VisualEffect Parameters
All methods for adding visualeffects use the following parameters:
- current_state - name of the state that this visualeffect should be added to.
- visual_id - (optional for all but custom visualeffects) a unique string ID for this visualeffect.
🔗 Built-in VisualEffects
🔗 CSSEffect
A CSSEffect applies a change to the CSS styling of a particular widget.
tut.AddCSSEffect(current_state, widget, attr_name, attr_value, visual_id);
- widget is the widget to apply the change to
- attr_name is the string name of the attribute to change
- attr_value is the new value of the attribute
The given attribute will be reverted back to its previous state when the effect is deactivated.
🔗 OverlayEffect
An OverlayEffect adds a colored overlay on top of everything else on the page.
tut.AddOverlayEffect(current_state, parent, color, opacity, z-index, intercept_mouse, visual_id);
- parent is the Div you want the overlay to be added to. Typically, the Document (which is a Div) where all your widgets live works fine here.
Optional parameters:
- color is the CSS string describing the color of the overlay. Default = “black”
- opacity is a float for the opacity of the overlay. Default = 0.4
- z-index is the z-index of the overlay. Default = 1000
- intercept_mouse is a bool indicating whether or not the overlay should receive pointer events. Can be set to prevent elements under the overlay from being clicked. Default = false
This effect is an easy way to help draw a user’s attention to a particular widget (you can make the widget appear above the overlay using a CSSEffect to change its z-index).
🔗 PopoverEffect (Experimental)
PopoverEffect is essentially a message bubble that you can set to appear over a particular widget. This would be super handy because it serves as a visual cue while also providing useful text information to the user. It’s named after the Bootstrap Popover class, because that’s what we hoped to use within our class.
Unfortunately, we weren’t able to make the Bootstrap popovers work, because of some restrictions currently within Empirical (described here)
We began trying to create a custom popover class using Empirical functionality, but it turns out to be no trivial task to get these working reliably. So this feature is not really usable as of now. ![]()
🔗 Custom VisualEffects
To create a custom visualeffect, define a class that inherits from VisualEffect:
class CustomVisualEffect : public VisualEffect {

    friend class Tutorial;
    friend class State;

    CustomVisualEffect(...) {};

    void Activate() {}
    void Deactivate() {}
};
- The friend declarations are necessary, and the Activate/Deactivate methods must be defined.
- Activate() is called every time a state containing the visualeffect is entered. It will also be called immediately if a visualeffect is added to the current state.
- Deactivate() is called when a state containing the visualeffect is exited, or when the visualeffect is removed.
Then, to add your custom visualeffect:
tut.AddCustomVisualEffect(current_state, custom_arg_1, custom_arg_2, ..., visual_id);
- As with custom triggers, the visual_id is required for custom visualeffects.
🔗 Reusing VisualEffects
If you’ve previously added a visualeffect to some state, you may add it to another state with this method:
tut.AddExistingVisualEffect(current_state, visual_id);
🔗 Removing VisualEffects
As with triggers, You may also remove a visualeffect from any state containing it:
tut.RemoveVisualEffect(state_name, visual_id);
Note that this will deactivate the visualeffect if it is active.
🔗 Tutorial Flow
🔗 Starting the Tutorial
The tutorial does not become active until you start it. To do this, you call StartAtstate(), and provide it the name of a state:
tut.StartAtState("add_task");
This will activate all visualeffects and triggers in the given state.
🔗 Stopping the Tutorial
The tutorial will stop automatically if an end state is entered. But if you wish to stop it manually:
tut.Stop();
This will deactivate all visuals and triggers in the current state.
🔗 Callbacks
Any trigger or state can be provided a callback function.
- For states, the callback will be called when the state is entered.
- For triggers, the callback will be called when the trigger fires (but before the next state is entered).
One potential use for callbacks is disabling any widgets that are not involved in the current state.
🔗 Setting Callbacks
You can set callbacks when the state/trigger is added, by providing the optional callback argument that you saw in previous sections.
You can also set a callback at any time using the SetStateCallback() / SetTriggerCallback() methods:
tut.SetStateCallback(state_id, callback);
tut.SetTriggerCallback(trigger_id, callback);
🔗 Full Code Example
Here is a full, runnable example of app with a tutorial. This app doesn’t do anything meaningful, but hopefully it’s helpful :)
Our app has two widgets, a button and an input text box. Our tutorial will involve have two steps:
- Click the button.
- Type something into the text box and press enter.
We’ll use an EventListenerTrigger for the button, and a ManualTrigger for the text box.
For visuals, we simply use two OverlayEffects to dim out everything but the widget for each step, combined with CSSEffects to pop the widgets above. We set intercept_mouse to true for the overlays, so that we can’t click on anything below.
#include "web/web.h"
#include "web/KeypressManager.h"
#include <iostream>
#include "web/Tutorial.h"

namespace UI = emp::web;

UI::Document doc("emp_base");
UI::Button my_button([](){}, "Click me!");
UI::Input my_input([](std::string s){}, "text", "");

Tutorial tut;


void OnInputEnter(UI::KeyboardEvent evt) {

    if (evt.keyCode == 13) {

        std::string inputStr = my_input.GetCurrValue();

        if (!inputStr.empty())
            tut.FireTrigger("enter_input_trigger");
    }
}

void PrintComplete() { std::cout << "Tutorial Complete!" << std::endl; }


int main() {

    doc << my_button;
    doc << my_input;

    my_input.On("keypress", &OnInputEnter);

    // since z-index can only be set on positioned elements...
    my_button.SetCSS("position", "relative");
    my_input.SetCSS("position", "relative");


    tut.AddState("first_state");
    tut.AddState("second_state");
    tut.AddState("end_state", &PrintComplete);

    tut.AddEventListenerTrigger("first_state", "second_state", my_button, "click");
    tut.AddManualTrigger("second_state", "end_state", "enter_input_trigger");

    tut.AddOverlayEffect("first_state", doc, "black", 0.5, 1000, true);
    tut.AddCSSEffect("first_state", my_button, "z-index", "10000");

    tut.AddOverlayEffect("second_state", doc, "blue", 0.5, 1000, true);
    tut.AddCSSEffect("second_state", my_input, "z-index", "10000");

    tut.StartAtState("first_state");

}
If you click the button, then enter something in the text box, you should see “Tutorial Complete” printed to the console!
And there you have it, a complete tutorial created with exactly 14 lines of code! ![]()
🔗 Difficulties and Future Directions
We encountered several obstacles while working on this project.
The first issue was that Empirical’s Listeners class could only apply a single event handler for any event at a time. This was a problem because our EventListenerTrigger needed to add its own event handlers, in addition to any that the user may have set. So first, we enhanced the Listeners class to support adding any number of event handlers.
The second big issue, which we weren’t able to address, is that Empirical’s web system does not play nicely with JavaScript code. Any changes made to a widget’s properties must be made from the C++ side, or else those changes will be wiped out when Empirical redraws the widget. This caused us quite a bit of confusion before we identified the issue, and it also prevented us from being able to implement a JavaScript popover library. Popovers are probably the most useful feature that the system is currently lacking, so we hope that the necessary changes to support this can be made to Empirical.
We’re not sure whether a system like this might also be useful for native Empirical apps. The high-level framework is not web-specific, so this may be an area for potential development.
🔗 Acknowledgements
I’d like to give credit to Austin Ferguson (@FergusonAJ17) for being an excellent mentor on this project. He came up with the rough outline for the system, and contributed to every aspect of its design, as well as some of the code itself!
Thanks also to everyone on the WAVES team who helped with advice, tips, and feedback. ![]()
This project gave me the opportunity to learn a lot about web development, Empirical, and contributing to real-life distributed software. I hope that our contribution will prove to be a valuable addition to the library.